Archive for Web Host Manager 教程

cpanel使用第三方SSL(letsencrypt)非官方插件

细节看插件官方它好像是收费,我们只作测试请访问https://letsencrypt-for-cpanel.com/pricing 网站说明为试用72小时,你可以尝试72小时后是否还可以签发.

第三方SSL安装教程连接 https://letsencrypt-for-cpanel.com/docs/for-admins/installation/

1.增加安装源

wget https://cpanel.fleetssl.com/static/letsencrypt.repo -O /etc/yum.repos.d/letsencrypt.repo

2.更新安装软件

yum -y install letsencrypt-cpanel

3.安装后自检

le-cp self-test

下面为执行过程

[root@ireland ~]# yum -y install letsencrypt-cpanel Loaded plugins: fastestmirror, universal-hooks Loading mirror speeds from cached hostfile * EA4: 91.197.228.252 * cpanel-addons-production-feed: 91.197.228.252 * cpanel-plugins: 91.197.228.252 * base: ftp.tsukuba.wide.ad.jp * extras: ftp.tsukuba.wide.ad.jp * updates: ftp.tsukuba.wide.ad.jp EA4 | 2.9 kB 00:00:00 cpanel-addons-production-feed | 2.9 kB 00:00:00 cpanel-plugins | 2.9 kB 00:00:00 base | 3.6 kB 00:00:00 extras | 2.9 kB 00:00:00 letsencrypt-cpanel | 2.9 kB 00:00:00 mysql-connectors-community | 2.5 kB 00:00:00 mysql-tools-community | 2.5 kB 00:00:00 mysql57-community | 2.5 kB 00:00:00 updates | 2.9 kB 00:00:00 (1/2): letsencrypt-cpanel/primary_db | 5.7 kB 00:00:00 (2/2): cpanel-plugins/x86_64/primary_db | 30 kB 00:00:00 Resolving Dependencies –> Running transaction check —> Package letsencrypt-cpanel.x86_64 0:0.15.1-1 will be installed –> Finished Dependency Resolution Dependencies Resolved ============================================================================================================================================================================================================================================================= Package Arch Version Repository Size ============================================================================================================================================================================================================================================================= Installing: letsencrypt-cpanel x86_64 0.15.1-1 letsencrypt-cpanel 5.1 M Transaction Summary ============================================================================================================================================================================================================================================================= Install 1 Package Total download size: 5.1 M Installed size: 14 M Downloading packages: letsencrypt-cpanel-0.15.1-1.x86_64.rpm | 5.1 MB 00:00:00 Running transaction check Running transaction test Transaction test succeeded Running transaction *** By running this installer, you indicate that you have read the end-user licence agreement (https://cpanel.fleetssl.com/eula) and agree to all of its terms, as stated. *** Running installer as root OS version OK cPanel version OK No licence file detected at /etc/letsencrypt-cpanel.licence Fetching new trial licence … Licence file present Redirecting to /bin/systemctl stop letsencrypt-cpanel.service Failed to stop letsencrypt-cpanel.service: Unit letsencrypt-cpanel.service not loaded. FleetSSL cPanel service daemon stopped Installing : letsencrypt-cpanel-0.15.1-1.x86_64 1/1 This server has self-signed service certificates It is not safe to operate this plugin in this circumstance ‘insecure’ is being added to /etc/letsencrypt-cpanel.conf If you wish to generate a Let’s Encrypt cert for the server Please read the configuration documentation on our website, at https://cpanel.fleetssl.com/docs/service-certificates/ Config written to /etc/letsencrypt-cpanel.conf Uninstallation of existing service failed (it’s OK) Installed init scripts. Copied plugin files OK Installing cPanel paper_lantern plugin (may take a minute) … cPanel Plugin installer succeeded OK Installed chkservd scripts Added apache pre virtualhost global include Set cpanel tweak settings — Installation complete — The plugin should now be available in the cPanel feature manager Will rebuild conf and restart Apache to reload AutoSSL DCV URLs Rebuilding Apache conf and restarting now … Built /etc/apache2/conf/httpd.conf OK Verifying : letsencrypt-cpanel-0.15.1-1.x86_64 1/1 Installed: letsencrypt-cpanel.x86_64 0:0.15.1-1 Complete! [root@ireland ~]# le-cp self-test [SELF-TEST] Has valid licence ………… SUCCESS. [SELF-TEST] Can read config ………… SUCCESS. [SELF-TEST] Can connect to Let’s Encrypt ………… SUCCESS. [SELF-TEST] Can talk to WHM API ………… SUCCESS. [SELF-TEST] Can talk to plugin RPC ………… SUCCESS. [SELF-TEST] System tuning correctness ………… SUCCESS. [root@ireland ~]#


5.以下为使用方法 https://letsencrypt-for-cpanel.com/docs/for-admins/autossl/

1.关于自动签发( AutoSSL )

该插件可以提供“ AutoSSL”类型的功能。

默认情况下禁用。

如果启用,它将每隔12小时(在续订完成后进行处理):

  • 查找符合以下条件的虚拟主机
  • 没有有效的证书(未自签名且在接下来的48小时内没有过期)
  • 收集所有通过DCV(域控制验证)检查的域,并通过插件为所有域添加证书
  • DCV失败的域将被自动跳过
  • 超出“加密”速率限制的证书(即每个证书超过100个名称)
  • 反复失败的域最终将停止重试,但始终可以通过UI发出它们.

启用/禁用


启用(推荐)
[root@~]$ le-cp autossl enable
禁用
[root@~]$ le-cp autossl disable

5.人工签发(如果发现证书过期,首先要删除证书

(Home »SSL/TLS »Manage SSL Hosts

6.然后到SSH使用命令签发:

le-cp ssl --user=用户名  issue abc.com www.abc.com
成功例子:
[root@ireland ~]# le-cp ssl --user=drma**** issue drmartens*******.fi www.drmartens*******.fi
INFO[0011] 1 certificates were returned
INFO[0011] Domain: drmartens*******.fi
INFO[0011]      Requested AltNames: [drmartens*******.fi www.drmartens*******.fi]
INFO[0011]      Expiry: 2020-05-12 21:49:45 -0400 EDT
INFO[0011]      URL: https://acme-v02.api.letsencrypt.org/acme/order/78038503/2315490342
INFO[0011]      Cert ID: drmartens*******_fi_d2ae8_3e4c3_1589334585_c28571a4e7223c826fa6ba29749bb59a
INFO[0011]      Key ID: d2ae8_3e4c3_73dbff3b435eb636c6faf1f391287465
INFO[0011]      Actual DNS Names on Certificate: [drmartens*******.fi www.drmartens*******.fi]

Comments off

密码保护:cpanel合并用户

此内容受密码保护。如需查阅,请在下列字段中输入您的密码。

Comments off

罗马尼亚


罗马尼亚 抗投诉服务器

外贸空间 外贸服务器 外贸vps 抗投诉服务器 抗投诉vps 忽略投诉服务器 忽略投诉vps


no dmca free dmca  ignore dmca hosting

Offshore host

Offshore vps

Offshore dedicated server

销售E-mail:huarenarmy@gmail.com


E3-12xx / 32GB内存 / 1TB SSD / 61 IP 1台 225美元 (约1575 元)/月
E3-12xx / 32GB内存 / 2TB sata/ 61ip 210美元(约1470元)/月 1台
E5 / 32GB内存 / 2TB sata/ 61ip 210美元(约1470元)/月 2台

Comments off

密码保护:监控

此内容受密码保护。如需查阅,请在下列字段中输入您的密码。

Comments off

密码保护:win7 key

此内容受密码保护。如需查阅,请在下列字段中输入您的密码。

Comments off

cpanel改变默认ip

Steps in WHM:

  • Log into WHM and go to Basic cPanel & WHM Setup
  • Change the Primary IP here with the option that says “The IP address (only one address) that will be used for setting up shared IP virtual hosts
  • Note: This might not actually be necessary.

Log in to SSH, and do the following:

  • Edit /etc/sysconfig/network-scripts/ifcfg-eth0
    • Change the IPADDR and GATEWAY lines to match the new IP and Gateway for the new ip


  • Edit /etc/sysconfig/network
    • Change the GATEWAY line here if it does not exist in the ifcfg-* file.


  • Edit /etc/ips
    • Remove the new primary IP from this file if it is present
    • Add the old primary IP to this file with the format ::

  • Edit /var/cpanel/mainip
    • Replace the old primary IP with the new primary IP


  • Edit /etc/hosts
    • Replace the old primary IP with the new one if needed. The hostname’s dns will need to be updated too


  • Restart the network service to make the new IP the primary
    • service network restart
    • Note: You’re probably going to be disconnected at this point, and have to log in to ssh using the new primary ip.


  • Restart the ipaliases script to bring up the additional IP
    • service ipaliases restart

  • Run ifconfig and make sure all IPs show up correctly


  • Update the cpanel license to the new primary IP

评论

密码保护:cpanel whm

此内容受密码保护。如需查阅,请在下列字段中输入您的密码。

要查看留言请输入您的密码。

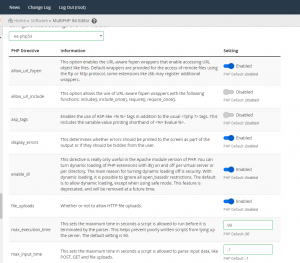
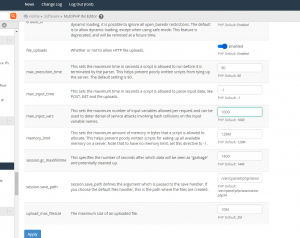
whm cpanel php.ini

评论

密码保护:关于cpanel 编译php5.4

此内容受密码保护。如需查阅,请在下列字段中输入您的密码。

要查看留言请输入您的密码。

cpanel关闭mysql strict mode的方法介绍

linux关闭mysql strict mode的方法非常简单,下面我来给大家总结了些常用的关闭mysql strict mode模式的例子,希望文章对各位同学会带来帮助。

首先用putty连接linux终端

vi /etc/my.cnf

在最后一行看到:

sql-mode= NO_AUTO_CREATE_USER,NO_ENGINE_SUBSTITUTION

保存后service mysqld restart

评论

Disable SSLv2 on cPanel and Apache Ports

On this post we are going to show how to quickly patch a common PCI Vulnerability Alert that says something like this:
“The remote service appears to encrypt traffic using SSL protocol version 2?.

In Apache common ports 80 and 443, you need to modify the SSLCipherSuite directive in the httpd.conf or ssl.conf file.
An example would be editing the following lines to something like:

在whm路径

WHM > Apache Configuration > Global Configuration area

1.
SSLProtocol -ALL +SSLv3 +TLSv1
2.
SSLCipherSuite ALL:!ADH:RC4+RSA:+HIGH:+MEDIUM:-LOW:-SSLv2:-EXP

After you have done this, if you see you are still getting PCI Compliance vulnerability emails regarding to this issue its probably that cPanel is still allowing SSLv2 on their ports.

To quickly disable SSL version 2 on cPanel ports: 2082, 2083, 2086, 2087, 2095, 2096. You will need to do the following:

edit /var/cpanel/cpanel.config and change nativessl=1 to nativessl=0

This will make cPanel to use sTunnel.

edit /usr/local/cpanel/etc/stunnel/default/stunnel.conf

and add:

1.
options = NO_SSLv2

just below the “Authentication stuff” tab.

After you have done all this you will need to restart cPanel:

1.
/etc/init.d/cpanel restart

Done!

How to quickly check this?

SSH to your server and type the following commands

1.
root@cPanel [~]# openssl s_client -ssl2 -connect localhost:2096
2.
root@cPanel [~]# openssl s_client -ssl2 -connect localhost:2083
3.
root@cPanel [~]# openssl s_client -ssl2 -connect localhost:2087
4.
root@cPanel [~]# openssl s_client -ssl2 -connect localhost:2086

If everything is fine you should receive something like this,

1.
root@cPanel [~]# openssl s_client -ssl2 -connect localhost:2096
2.
CONNECTED(00000003)
3.
write:errno=104

评论

500 No response from subprocess (whostmgr (whostmgr)): The subprocess exited with status 127 (EKEYEXPIRED)

If you see such an error message after logging into cPanel, it says something is broken with the cPanel system. First step you should do is to take a look into the cPanel error log. An eaiest way to do this is, run the following command in command line and reload the WHM/cPanel inteface; that will show you the latest errors while loading the panel.

tail -f /usr/local/cpanel/logs/error_log

Once the error is identified, you may take corrective actions and fix errors. Many errors can be fixed by running a cPanel update, but sometime it needs additional troubleshooting steps.

For example, a sample error we were facing with one of the servers is following.

/usr/local/cpanel/whostmgr/bin/whostmgr: error while loading shared libraries: /usr/local/cpanel/3rdparty/perl/514/lib64/perl5/cpanel_lib/x86_64-linux-64int/auto/Cpanel/Optimizer/Optimizer.so: cannot open shared object file: No such file or directory
Duplicate logaccess: at /usr/local/cpanel/Cpanel/Server.pm line 421.
Cpanel::Server::logaccess(Cpanel::Server=HASH(0x380aed0)) called at /usr/local/cpanel/Cpanel/Server.pm line 365
Cpanel::Server::body_internal_error(Cpanel::Server=HASH(0x380aed0), 500, “No response from subprocess (whostmgr (whostmgr)): The subpro”…) called at /usr/local/cpanel/Cpanel/Server.pm line 313

The error states, there is a missing library for whostmgr binary. We fixed the above error by running the following commands

/scripts/autorepair fix_duplicate_cpanel_rpms
/usr/local/cpanel/scripts/check_cpanel_rpms –fix

评论

capnel whm gmail发信通知

vi /etc/sysconfig/iptables


在防火墙加入规则以下

-A INPUT -p tcp -m state –state NEW -m tcp –dport 465 -j ACCEPT
/etc/init.d/iptables restart
#最后重启防火墙使配置生效

评论

cpanel 突然发性出现403 修复

/scripts/rebuildhttpdconf
/scripts/restartsrv_httpd

评论

cpanel apache重建立

/scripts/rebuildhttpdconf

评论

« Previous entries 下一页 » 下一页 »