Archive for 11 月, 2017

负载高,自动重启mysql,apache

#!/bin/sh
# crontab: */3 * * * * /root/loadavg_restart_apache.sh >> /var/log/restart_apache.log
sync
sync
echo 3 > /proc/sys/vm/drop_caches
TOP_SYS_LOAD_NUM=5
SYS_LOAD_NUM=`uptime | awk ‘{print $(NF-2)}’ | sed ‘s/,//’`
echo $(date +”%y-%m-%d”) `uptime`
if [ `echo “$TOP_SYS_LOAD_NUM < $SYS_LOAD_NUM”|bc` -eq 1 ]
then
sync
echo “#0#” $(date +”%y-%m-%d %H:%M:%S”) “pkill httpd” `ps -ef | grep httpd | wc -l`
echo “#0#” $(date +”%y-%m-%d %H:%M:%S”) “pkill mysql” `ps -ef | grep mysql | wc -l`
service httpd stop
service mysql stop
sleep 8
pkill httpd
pkill mysql

sleep 8
for i in 1 2 3
do
if [ `pgrep mysql | wc -l` -le 0 ]
then
/sbin/service mysql start

sleep 30
echo “#1#” $(date +”%y-%m-%d %H:%M:%S”) “start mysql” `ps -ef | grep mysql | wc -l`

fi

if [ `pgrep httpd | wc -l` -le 0 ]
then

service httpd start

      service wdapache start

sleep 30

echo “#1#” $(date +”%y-%m-%d %H:%M:%S”) “start httpd” `ps -ef | grep httpd | wc -l`
fi

done
else
if [ `pgrep mysql | wc -l` -le 0 ]
then
/sbin/service mysql start

sleep 30
echo “#2#” $(date +”%y-%m-%d %H:%M:%S”) “start mysql” `ps -ef | grep mysql | wc -l`

fi

if [ `pgrep httpd | wc -l` -le 0 ]
then

service httpd start


sleep 30

echo “#2#” $(date +”%y-%m-%d %H:%M:%S”) “start httpd” `ps -ef | grep httpd | wc -l`
fi

fi

将以上文件,保存在 /root/loadavg_restart_apa_my.sh

然后在

crontab -e

添加

*/3 * * * * /root/loadavg_restart_apa_my.sh >> /var/log/restart_apa_my.log

*/3 ***** 表示3分钟,/root/loadavg_restart_apa_my.sh 你可以自定义。
评论

directadmin恢复

Step 1

Run System Backup on the old server.

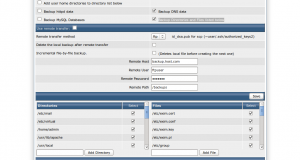
Admin Tools >> System Backup


We will be backuping home directories and mysql db’s manually so Uncheck and unselect the following options on System Backup

Add user home directories to directory list below

Backup httpd data

Backup MySQL Databases

Check and Select

Backup DNS data

Backup Directories and Files listed below

All directories/files listed in bottom section of the System Backup

now click on the Run System Backup Now icon . The backup will be stored mostly in /home/backup ( it will depend upon how you have set it in DA )

Step 2

rsync the system backup to the Newserver.

root@old:~# rsync -avurz -e ssh –delete /home/backup root@Newserver_IP:/home/backup

Step 3

On the Newserver restore the system backups one by one manually.

For example, for restoring your /etc/virtual directory,

root@new:~# cd /etc
root@new:~# tar xvzfp /home/backup/<backup_date>/custom/etc/virtual.tar.gz

Please check here for the complete paths and files used on a DirectAdmin system.

( Do take extra care while restoring /etc/passwd /etc/shadow /etc/group etc.. )

Step 4

Synchronise the home directory

root@old:~# rsync -avurz -e ssh –delete /home root@Newserver_IP:/home

Step 5

Backup and restore the mysql DB’s

On Oldserver

root@old:~# cat /usr/local/directadmin/conf/mysql.conf

Get the da_admin password from the above file

root@old:~# mysqldump -u da_admin -p  –all-databases > /root/all_databases.sql

root@old:~# scp /root/all_databases.sql root@Newserver_IP:/root

On Newserver

root@new:~# cat /usr/local/directadmin/conf/mysql.conf

root@new:~# mysql -u da_admin -p < /root/all_databases.sql

Step 6

Use the ipswap script to change the Oldserver IP’s

root@new:~# cd /usr/local/direactadmin/scripts/

root@new:~# ./ipswap.sh Oldserver_IP  Newserver_IP

Step 7

Update the nameservers to the Newserver IP’s.

Step 8

To resolve all the queries correctly to the new server . You will have to setup the multi server dns clustering on the new server

评论

密码保护:cpanel whm

此内容受密码保护。如需查阅,请在下列字段中输入您的密码。

要查看留言请输入您的密码。

密码保护:SSH,Firefox和Putty实现 上网

此内容受密码保护。如需查阅,请在下列字段中输入您的密码。

要查看留言请输入您的密码。